简介 在初学Android的时候,一般是从四大组件开始学起的。最开始学,是通过追代码流程的方式快速熟悉Android系统框架。
在这个速学的过程中,很多细节部分就被忽略掉了(这也是必须的,否则学起来极其痛苦且缓慢)。
比如四大组件之一的Service,在跨进程通信的时候,我们只知道是通过Binder通信的。至于内部实现是如何就不甚了了。
接下来我们通过一个简单的Demo深入探究这个跨进程通信的过程。
一. 在App之间使用Binder通信 目标是在AppClient中给AppServer发送一个简单的字符串
1.1 创建Interface 首先在服务端提供接口文件:IDemoInterface.
Android Studio中通过”File->New->AIDL”创建这个 aidl 文件。
1
2
3
4
5
6
7
interface IDemoInterface { /** * Demonstrates some basic types that you can use as parameters * and return values in AIDL. */ void sayHello(long aLong, String aString); }
创建之后需要在 “Build->Rebuild Project”, 生成对应可用的文件
1.2 实现服务端接口 1 2 3 4 5 6 7 8 9 10 11 12 13 14 15 class DemoService : Service val mName = "DemoService" class DemoBinder :IDemoInterface.Stub override fun sayHello (aLong: Long , aString: String ?) Log.d("DemoService" , "$aString :$aLong " ) } } private val binder = DemoBinder() override fun onBind (intent: Intent ?) return binder } }
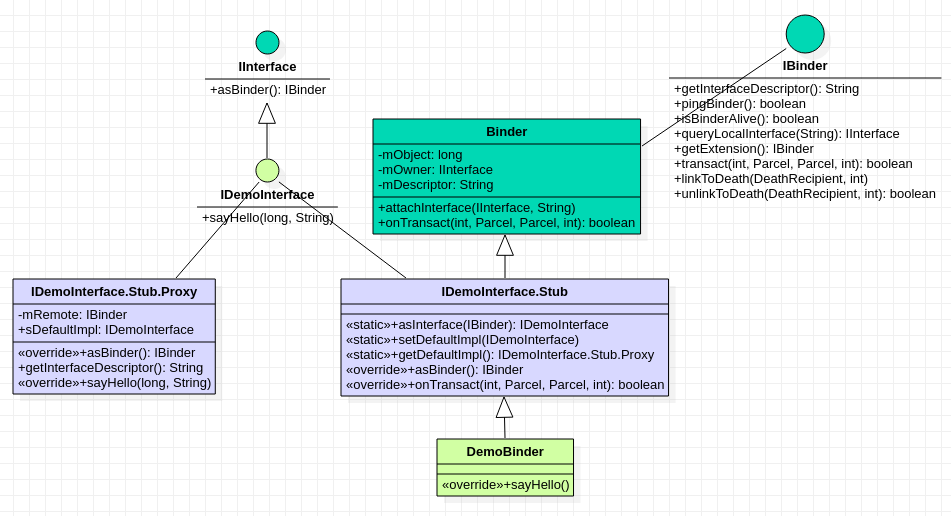
很简单,就是将传入的字符串输出出来。但是这个地方就有一个疑问,为啥是继承IDemoInterface.Stub呢?直接看这个文件的内容:
1 2 3 4 5 6 7 8 9 10 11 12 13 14 15 16 17 18 19 20 21 22 23 24 25 26 27 28 29 30 31 32 33 34 35 36 37 38 39 40 41 42 43 44 45 46 47 48 49 50 51 52 53 54 55 56 57 58 59 60 61 62 63 64 65 66 67 68 69 70 71 72 73 74 75 76 77 78 79 80 81 82 83 84 85 86 87 88 89 90 91 92 93 94 95 96 97 98 99 100 101 102 103 104 105 106 107 108 109 110 111 112 113 114 115 116 117 118 119 120 121 122 123 124 125 126 127 128 129 130 131 132 133 134 135 136 137 package com.oneplus.opbench.server;public interface IDemoInterface extends android .os.IInterface{ public static class Default implements com .oneplus.opbench.server.IDemoInterface { @Override public void sayHello (long aLong, java.lang.String aString) throws android.os.RemoteException { } @Override public android.os.IBinder asBinder () { return null ; } } public static abstract class Stub extends android .os.Binder implements com .oneplus.opbench.server.IDemoInterface { private static final java.lang.String DESCRIPTOR = "com.oneplus.opbench.server.IDemoInterface" ; public Stub () { this .attachInterface(this , DESCRIPTOR); } public static com.oneplus.opbench.server.IDemoInterface asInterface (android.os.IBinder obj) { if ((obj==null )) { return null ; } android.os.IInterface iin = obj.queryLocalInterface(DESCRIPTOR); if (((iin!=null )&&(iin instanceof com.oneplus.opbench.server.IDemoInterface))) { return ((com.oneplus.opbench.server.IDemoInterface)iin); } return new com .oneplus.opbench.server.IDemoInterface.Stub.Proxy(obj); } @Override public android.os.IBinder asBinder () { return this ; } @Override public boolean onTransact (int code, android.os.Parcel data, android.os.Parcel reply, int flags) throws android.os.RemoteException { java.lang.String descriptor = DESCRIPTOR; switch (code) { case INTERFACE_TRANSACTION: { reply.writeString(descriptor); return true ; } case TRANSACTION_sayHello: { data.enforceInterface(descriptor); long _arg0; _arg0 = data.readLong(); java.lang.String _arg1; _arg1 = data.readString(); this .sayHello(_arg0, _arg1); reply.writeNoException(); return true ; } default : { return super .onTransact(code, data, reply, flags); } } } private static class Proxy implements com .oneplus.opbench.server.IDemoInterface { private android.os.IBinder mRemote; Proxy(android.os.IBinder remote) { mRemote = remote; } @Override public android.os.IBinder asBinder () { return mRemote; } public java.lang.String getInterfaceDescriptor () { return DESCRIPTOR; } @Override public void sayHello (long aLong, java.lang.String aString) throws android.os.RemoteException { android.os.Parcel _data = android.os.Parcel.obtain(); android.os.Parcel _reply = android.os.Parcel.obtain(); try { _data.writeInterfaceToken(DESCRIPTOR); _data.writeLong(aLong); _data.writeString(aString); boolean _status = mRemote.transact(Stub.TRANSACTION_sayHello, _data, _reply, 0 ); if (!_status && getDefaultImpl() != null ) { getDefaultImpl().sayHello(aLong, aString); return ; } _reply.readException(); } finally { _reply.recycle(); _data.recycle(); } } public static com.oneplus.opbench.server.IDemoInterface sDefaultImpl; } static final int TRANSACTION_sayHello = (android.os.IBinder.FIRST_CALL_TRANSACTION + 0 ); public static boolean setDefaultImpl (com.oneplus.opbench.server.IDemoInterface impl) { if (Stub.Proxy.sDefaultImpl == null && impl != null ) { Stub.Proxy.sDefaultImpl = impl; return true ; } return false ; } public static com.oneplus.opbench.server.IDemoInterface getDefaultImpl () { return Stub.Proxy.sDefaultImpl; } } public void sayHello (long aLong, java.lang.String aString) throws android.os.RemoteException; }
注释的就很清楚,是自动生成的文件。Stub是一个静态内部抽象类,继承了Binder和接口IDemoInterface。
1.3 客户端调用 注意把服务端aidl文件夹内容拷贝到客户端项目的aidl文件内,然后客户端也rebuild一下project.
1 2 3 4 5 6 7 8 9 10 11 12 13 14 15 16 17 18 19 20 21 22 23 24 25 26 27 28 29 30 31 32 33 34 35 36 37 38 39 40 private fun attemptToBindService () val intent = Intent() Log.e("client" , " connected now" ) intent.action = "android.intent.action.DemoService" intent.`package ` = "com.oneplus.opbench" bindService(intent, mServiceConnection, Context.BIND_AUTO_CREATE) } private val mDemoServiceConnection = object : ServiceConnection { override fun onBindingDied (name: ComponentName ?) Log.d("Client" , "DemoService died!" ) } override fun onServiceDisconnected (p0: ComponentName ?) Log.d("Client" , "DemoService disconnected!" ) } override fun onServiceConnected (p0: ComponentName ?, p1: IBinder ?) Log.d("Client" , "DemoService connected" ) val mProxyBinder = IDemoInterface.Stub.asInterface(p1) try { mProxyBinder.sayHello(5000 , "Hello?" ) } catch (e:RemoteException) { } } }
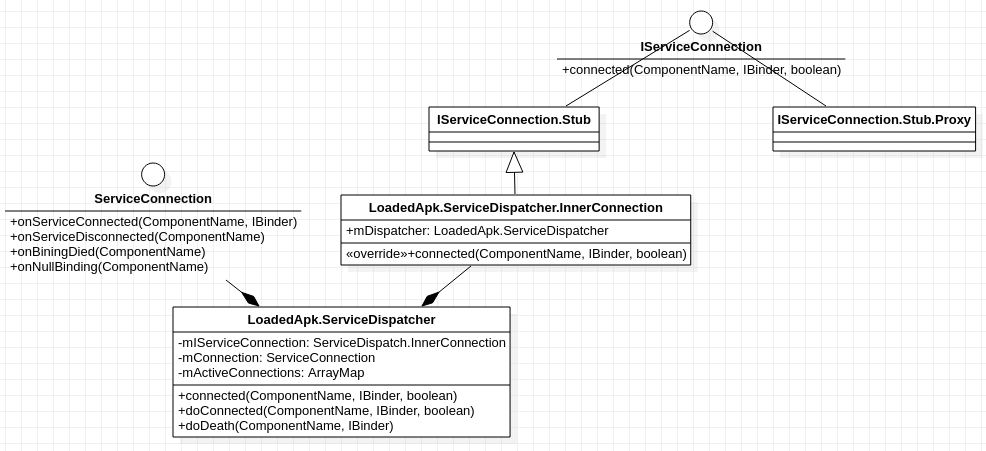
相关类图
接下来我们从客户端的bindService建立远程连接开始看看是怎么通信的,当然这里我们重点是binder通信,而不是service的bind流程。
二. 通信过程 分析跨进程通信的过程,一定要时刻谨记当前代码所处的进程哦, 为了方便和聚焦, 忽略非紧要代码。
2.1 Client=>ContextImpl.bindService 1 2 3 4 5 6 7 8 9 10 11 12 13 14 15 16 17 18 19 20 21 22 23 24 25 26 27 28 @Override public boolean bindService (Intent service, ServiceConnection conn, int flags) { warnIfCallingFromSystemProcess(); return bindServiceCommon(service, conn, flags, null , mMainThread.getHandler(), null , getUser()); } private boolean bindServiceCommon (Intent service, ServiceConnection conn, int flags, String instanceName, Handler handler, Executor executor, UserHandle user) { IServiceConnection sd; if (mPackageInfo != null ) { if (executor != null ) { sd = mPackageInfo.getServiceDispatcher(conn, getOuterContext(), executor, flags); } else { sd = mPackageInfo.getServiceDispatcher(conn, getOuterContext(), handler, flags); } } int res = ActivityManager.getService().bindIsolatedService( mMainThread.getApplicationThread(), getActivityToken(), service, service.resolveTypeIfNeeded(getContentResolver()), sd, flags, instanceName, getOpPackageName(), user.getIdentifier()); }
2.1.1 LoadedApk.getServiceDispatcher 1 2 3 4 5 6 7 8 9 10 11 12 13 14 15 16 17 18 19 20 21 22 23 24 25 26 27 28 29 30 31 32 33 34 35 @UnsupportedAppUsage public final IServiceConnection getServiceDispatcher (ServiceConnection c, Context context, Handler handler, int flags) { return getServiceDispatcherCommon(c, context, handler, null , flags); } private IServiceConnection getServiceDispatcherCommon (ServiceConnection c, Context context, Handler handler, Executor executor, int flags) { synchronized (mServices) { LoadedApk.ServiceDispatcher sd = null ; ArrayMap<ServiceConnection, LoadedApk.ServiceDispatcher> map = mServices.get(context); if (map != null ) { if (DEBUG) Slog.d(TAG, "Returning existing dispatcher " + sd + " for conn " + c); sd = map.get(c); } if (sd == null ) { if (executor != null ) { sd = new ServiceDispatcher (c, context, executor, flags); } else { sd = new ServiceDispatcher (c, context, handler, flags); } if (DEBUG) Slog.d(TAG, "Creating new dispatcher " + sd + " for conn " + c); if (map == null ) { map = new ArrayMap <>(); mServices.put(context, map); } map.put(c, sd); } else { sd.validate(context, handler, executor); } return sd.getIServiceConnection(); } }
这里就是将ServiceConnection做一个打包,存起来,隐藏细节,注意到返回的是 InnerConnection 类型哦。
2.2 SytemServer=>AMS.bindIsolatedService 这里其实就存在Binder通信,但是我们先不看,假设直接call过来了(四大组件之Service).
我们知道,当服务端app进程没有启动时,会先将进程启动,然后继续进行bindService操作,为了方便,这里假设服务端进程已启动。
这里忽略中间一系列调用,走到ActiveServices.bindServiceLocked中:
1 2 3 4 5 6 7 8 9 10 11 12 13 14 15 16 17 18 19 20 21 22 23 24 25 26 27 28 29 30 31 32 33 34 35 36 37 38 39 int bindServiceLocked (IApplicationThread caller, IBinder token, Intent service, String resolvedType, final IServiceConnection connection, int flags, String instanceName, String callingPackage, final int userId) throws TransactionTooLargeException { ServiceLookupResult res = retrieveServiceLocked(service, instanceName, resolvedType, callingPackage, Binder.getCallingPid(), Binder.getCallingUid(), userId, true , callerFg, isBindExternal, allowInstant); ServiceRecord s = res.record; AppBindRecord b = s.retrieveAppBindingLocked(service, callerApp); ConnectionRecord c = new ConnectionRecord (b, activity, connection, flags, clientLabel, clientIntent, callerApp.uid, callerApp.processName, callingPackage); IBinder binder = connection.asBinder(); if (s.app != null && b.intent.received) { try { c.conn.connected(s.name, b.intent.binder, false ); } catch (Exception e) { Slog.w(TAG, "Failure sending service " + s.shortInstanceName + " to connection " + c.conn.asBinder() + " (in " + c.binding.client.processName + ")" , e); } }
2.3 Client=>LoadedApk.ServiceDispatcher.InnerConnection.connected 1 2 3 4 5 6 7 public void connected (ComponentName name, IBinder service, boolean dead) throws RemoteException { LoadedApk.ServiceDispatcher sd = mDispatcher.get(); if (sd != null ) { sd.connected(name, service, dead); } }
2.3.1 LoadedApk.ServiceDispatcher.connected 1 2 3 4 5 6 7 8 9 10 public void connected (ComponentName name, IBinder service, boolean dead) { if (mActivityExecutor != null ) { mActivityExecutor.execute(new RunConnection (name, service, 0 , dead)); } else if (mActivityThread != null ) { mActivityThread.post(new RunConnection (name, service, 0 , dead)); } else { doConnected(name, service, dead); } }
2.3.2 LoadedApk.ServiceDispatcher.doConnected 1 2 3 4 5 6 7 8 9 10 11 12 public void doConnected (ComponentName name, IBinder service, boolean dead) { if (service != null ) { mConnection.onServiceConnected(name, service); } else { mConnection.onNullBinding(name); } }
2.3.3 客户端的ServiceConnection 1 2 3 4 5 6 7 8 9 10 override fun onServiceConnected (p0: ComponentName ?, p1: IBinder ?) Log.d("Client" , "DemoService connected" ) val mProxyBinder = IDemoInterface.Stub.asInterface(p1) try { mProxyBinder.sayHello(5000 , "Hello?" ) } catch (e:RemoteException) { } }
到这里,Android系统中两个进程通过四大组件之一的Service进行跨进程通信的连接已经建立了。
简单来说这个过程借助了SystemServer的帮助:Client app <–> SystemServer <–> Server app
Server App将Service的IBinder保存在SystemServer中,在Client App通过bindService的时候,传入。这样Client App就有了和Server App通信的基础。
搞清楚是怎么建立连接的过程,接下来深入探究下mProxyBinder.sayHello调用到不同进程对应的方法的细节。
参考资料
Android Binder详解 https://mr-cao.gitbooks.io/android/content/android-binder.html