简介 接上文,我们现在了解了binder驱动的加载过程,回过头继续分析App使用Binder通信的过程。
先回顾下App使用binder通信的大致过程:
创建AIDL文件,定义接口函数并在服务端app中实现,并注册进SystemServer
客户端app通过SystemServer获取服务端注册的Service所代表的IBinder(BpBinder)
Client app <–> SystemServer <–> Server app
Server App将Service的IBinder保存在SystemServer中,在Client App通过bindService的时候,传入。
客户端app通过该IBinder与服务端app直接通信。
之前我们分析到最后一步是:IPCThreadState#talkWithDriver
1
2
3
4
5
6
7
8
9
10
11
12
13
14
15
16
17
18
19
20
21
22
23
24
status_t IPCThreadState::talkWithDriver (bool doReceive) do { if (ioctl (mProcess->mDriverFD, BINDER_WRITE_READ, &bwr) >= 0 ) err = NO_ERROR; else err = -errno; if (mProcess->mDriverFD < 0 ) { err = -EBADF; } IF_LOG_COMMANDS () { alog << "Finished read/write, write size = " << mOut.dataSize () << endl; } } while (err == -EINTR); return err; }
在前面我们也了解了ioctl的用法,简单回顾下:
int ioctl(int fd, unsigned long request, …);
fd 必须是打开文件描述符。
cmd 是依赖于设备的请求代码, 即交互协议,设备驱动将根据 cmd 执行对应操作
argp(…) 是指向内存的非类型指针, 它传统上是char*argp, ioctl()请求在其中编码了参数是in参数还是out参数,参数argp的大小以字节为单位。
这里我们还不知道此处的ioctl是怎么和binder驱动勾搭上的,是因为我们之前分析客户端app使用ioctl的时候忽略了IPCThreadState的初始化。
传入的参数mProcess->mDriverFD这个文件描述符是怎么获取的呢,接下来先看IPCThreadState的初始化。
一. IPCThreadState的初始化 我们在调用transact的时候,会先调用self()函数,这个函数就是初始化用的。
1 2 IPCThreadState::self ()->transact ( mHandle, code, data, reply, flags);
1.1 IPCThreadState::self 1 2 3 4 5 6 7 8 9 10 11 12 13 14 15 16 17 18 19 20 21 22 23 24 25 26 27 28 29 30 31 32 33 34 35 36 37 38 39 40 41 42 43 44 45 static pthread_mutex_t gTLSMutex = PTHREAD_MUTEX_INITIALIZER;static std::atomic<bool > gHaveTLS (false ) static pthread_key_t gTLS = 0 ;static std::atomic<bool > gShutdown = false ;static std::atomic<bool > gDisableBackgroundScheduling = false ;IPCThreadState* IPCThreadState::self () if (gHaveTLS.load (std::memory_order_acquire)) { restart: const pthread_key_t k = gTLS; IPCThreadState* st = (IPCThreadState*)pthread_getspecific (k); if (st) return st; return new IPCThreadState; } if (gShutdown.load (std::memory_order_relaxed)) { ALOGW ("Calling IPCThreadState::self() during shutdown is dangerous, expect a crash.\n" ); return nullptr ; } pthread_mutex_lock (&gTLSMutex); if (!gHaveTLS.load (std::memory_order_relaxed)) { int key_create_value = pthread_key_create (&gTLS, threadDestructor); if (key_create_value != 0 ) { pthread_mutex_unlock (&gTLSMutex); ALOGW ("IPCThreadState::self() unable to create TLS key, expect a crash: %s\n" , strerror (key_create_value)); return nullptr ; } gHaveTLS.store (true , std::memory_order_release); } pthread_mutex_unlock (&gTLSMutex); goto restart; }
在Linux 中,新建的线程并不是在原先的进程中,而是系统通过一个系统调用clone() 。
1.2 IPCThreadState实例化 1 2 3 4 5 6 7 8 9 10 11 12 13 14 15 16 IPCThreadState::IPCThreadState () : mProcess (ProcessState::self ()), mServingStackPointer (nullptr ), mWorkSource (kUnsetWorkSource), mPropagateWorkSource (false ), mStrictModePolicy (0 ), mLastTransactionBinderFlags (0 ), mCallRestriction (mProcess->mCallRestriction) { pthread_setspecific (gTLS, this ); clearCaller (); mIn.setDataCapacity (256 ); mOut.setDataCapacity (256 ); }
1.3 ProcessState::self 1 2 3 4 5 6 7 8 9 10 11 12 13 14 15 16 #ifdef __ANDROID_VNDK__ const char * kDefaultDriver = "/dev/vndbinder" ;#else const char * kDefaultDriver = "/dev/binder" ;#endif sp<ProcessState> ProcessState::self () Mutex::Autolock _l(gProcessMutex); if (gProcess != nullptr ) { return gProcess; } gProcess = new ProcessState (kDefaultDriver); return gProcess; }
1.4 ProcessState实例化 1 2 3 4 5 6 7 8 9 10 11 12 13 14 15 16 17 18 19 20 21 22 23 24 25 26 27 28 29 30 ProcessState::ProcessState (const char *driver) : mDriverName (String8 (driver)) , mDriverFD (open_driver (driver)) , mVMStart (MAP_FAILED) , mThreadCountLock (PTHREAD_MUTEX_INITIALIZER) , mThreadCountDecrement (PTHREAD_COND_INITIALIZER) , mExecutingThreadsCount (0 ) , mMaxThreads (DEFAULT_MAX_BINDER_THREADS) , mStarvationStartTimeMs (0 ) , mBinderContextCheckFunc (nullptr ) , mBinderContextUserData (nullptr ) , mThreadPoolStarted (false ) , mThreadPoolSeq (1 ) , mCallRestriction (CallRestriction::NONE) { if (mDriverFD >= 0 ) { mVMStart = mmap (nullptr , BINDER_VM_SIZE, PROT_READ, MAP_PRIVATE | MAP_NORESERVE, mDriverFD, 0 ); if (mVMStart == MAP_FAILED) { ALOGE ("Using %s failed: unable to mmap transaction memory.\n" , mDriverName.c_str ()); close (mDriverFD); mDriverFD = -1 ; mDriverName.clear (); } } }
1.5 open_driver - 打开binder驱动 1 2 3 4 5 6 7 8 9 10 11 12 13 14 15 16 17 18 19 20 21 22 23 24 25 26 27 28 29 30 31 32 static int open_driver (const char *driver) int fd = open (driver, O_RDWR | O_CLOEXEC); if (fd >= 0 ) { int vers = 0 ; status_t result = ioctl (fd, BINDER_VERSION, &vers); if (result == -1 ) { ALOGE ("Binder ioctl to obtain version failed: %s" , strerror (errno)); close (fd); fd = -1 ; } if (result != 0 || vers != BINDER_CURRENT_PROTOCOL_VERSION) { ALOGE ("Binder driver protocol(%d) does not match user space protocol(%d)! ioctl() return value: %d" , vers, BINDER_CURRENT_PROTOCOL_VERSION, result); close (fd); fd = -1 ; } size_t maxThreads = DEFAULT_MAX_BINDER_THREADS; result = ioctl (fd, BINDER_SET_MAX_THREADS, &maxThreads); if (result == -1 ) { ALOGE ("Binder ioctl to set max threads failed: %s" , strerror (errno)); } } else { ALOGW ("Opening '%s' failed: %s\n" , driver, strerror (errno)); } return fd; }
这里首先使用open函数打开对应目录的驱动文件,成功打开后调用ioctl函数获取Binder版本,最后还是通过ioctl设置最大binder线程。
我们常听闻在Linux中,一切皆文件,这里就体现出来了。回顾下binder驱动注册进文件系统时的操作函数集:
1 2 3 4 5 6 7 8 9 10 11 const struct file_operations binder_fops = { .owner = THIS_MODULE, .poll = binder_poll, .unlocked_ioctl = binder_ioctl, .compat_ioctl = binder_ioctl, .mmap = binder_mmap, .open = binder_open, .flush = binder_flush, .release = binder_release, };
1.5.1 open函数-binder_open 在app进程中通过open函数打开/dev/binder文件,就会调用到binder.c中的binder_open函数了。
我们来看看这个open的时候驱动里面具体做了什么吧,至于用户进程中调用open进而使用系统调用进入内核态调用到binder_open的方式我们后续分析。
1 2 3 4 5 6 7 8 9 10 11 12 13 14 15 16 17 18 19 20 21 22 23 24 25 26 27 28 29 30 31 32 33 34 35 36 37 38 39 40 41 42 43 44 45 46 47 48 49 50 51 52 53 54 55 56 57 58 59 60 61 62 63 64 65 66 67 68 69 70 71 72 73 74 75 76 77 78 79 80 81 82 83 84 85 86 87 88 89 90 91 92 93 94 95 96 97 98 99 100 101 102 103 104 105 106 107 108 109 110 111 112 113 114 static int binder_open (struct inode *nodp, struct file *filp) struct binder_proc *proc; struct binder_device *binder_dev; struct binderfs_info *info; struct dentry *binder_binderfs_dir_entry_proc = NULL ; binder_debug (BINDER_DEBUG_OPEN_CLOSE, "%s: %d:%d\n" , __func__, current->group_leader->pid, current->pid); proc = kzalloc (sizeof (*proc), GFP_KERNEL); if (proc == NULL ) return -ENOMEM; spin_lock_init (&proc->inner_lock); spin_lock_init (&proc->outer_lock); get_task_struct (current->group_leader); proc->tsk = current->group_leader; mutex_init (&proc->files_lock); INIT_LIST_HEAD (&proc->todo); if (binder_supported_policy (current->policy)) { proc->default_priority.sched_policy = current->policy; proc->default_priority.prio = current->normal_prio; } else { proc->default_priority.sched_policy = SCHED_NORMAL; proc->default_priority.prio = NICE_TO_PRIO (0 ); } if (is_binderfs_device (nodp)) { binder_dev = nodp->i_private; info = nodp->i_sb->s_fs_info; binder_binderfs_dir_entry_proc = info->proc_log_dir; } else { binder_dev = container_of (filp->private_data, struct binder_device, miscdev); } refcount_inc (&binder_dev->ref); proc->context = &binder_dev->context; binder_alloc_init (&proc->alloc); binder_stats_created (BINDER_STAT_PROC); proc->pid = current->group_leader->pid; INIT_LIST_HEAD (&proc->delivered_death); INIT_LIST_HEAD (&proc->waiting_threads); filp->private_data = proc; mutex_lock (&binder_procs_lock); hlist_add_head (&proc->proc_node, &binder_procs); mutex_unlock (&binder_procs_lock); if (binder_debugfs_dir_entry_proc) { char strbuf[11 ]; snprintf (strbuf, sizeof (strbuf), "%u" , proc->pid); proc->debugfs_entry = debugfs_create_file (strbuf, 0444 , binder_debugfs_dir_entry_proc, (void *)(unsigned long )proc->pid, &proc_fops); } if (binder_binderfs_dir_entry_proc) { char strbuf[11 ]; struct dentry *binderfs_entry; snprintf (strbuf, sizeof (strbuf), "%u" , proc->pid); binderfs_entry = binderfs_create_file (binder_binderfs_dir_entry_proc, strbuf, &proc_fops, (void *)(unsigned long )proc->pid); if (!IS_ERR (binderfs_entry)) { proc->binderfs_entry = binderfs_entry; } else { int error; error = PTR_ERR (binderfs_entry); if (error != -EEXIST) { pr_warn ("Unable to create file %s in binderfs (error %d)\n" , strbuf, error); } } } return 0 ; }
binder_open的函数做的事情也不复杂:
创建binder_proc, 其pid为当前进程的主进程pid
标记binder_device的引用计数+1
将当前binder_proc的proc_node加入binder_procs列表中
创建当前binder_proc的目录,目录名为: sys/kernel/debug/binder/proc/pid
/dev/binderfs/binder_logs/proc存在时,也在这个目录下创建对应pid目录
顺便说一下很多Linux内核宏都用 do { code; } while(0) 的形式,这个是确保code不会被打乱,比如:
1 2 3 4 5 #define demo do { codeA; codeB; } while(0) if (A) demo; nextCodeLine;
1.5.2 binder_ioctl - BINDER_VERSION & BINDER_SET_CONTEXT_MGR_EXT
status_t result = ioctl(fd, BINDER_VERSION, &vers);
从参数名称可以看到,这里是获取binder版本号。
1 2 3 4 5 6 7 8 9 10 11 12 13 14 15 16 17 18 19 20 21 22 23 24 25 26 27 28 29 30 31 32 33 34 35 36 37 38 39 40 41 42 43 44 45 46 47 48 49 50 51 52 53 54 55 56 57 58 59 60 61 62 63 64 static long binder_ioctl (struct file *filp, unsigned int cmd, unsigned long arg) int ret; struct binder_proc *proc = filp->private_data; struct binder_thread *thread; unsigned int size = _IOC_SIZE(cmd); void __user *ubuf = (void __user *)arg; binder_selftest_alloc (&proc->alloc); trace_binder_ioctl (cmd, arg); ret = wait_event_interruptible (binder_user_error_wait, binder_stop_on_user_error < 2 ); if (ret) goto err_unlocked; thread = binder_get_thread (proc); if (thread == NULL ) { ret = -ENOMEM; goto err; } switch (cmd) { case BINDER_SET_CONTEXT_MGR_EXT: { struct flat_binder_object fbo; if (copy_from_user (&fbo, ubuf, sizeof (fbo))) { ret = -EINVAL; goto err; } ret = binder_ioctl_set_ctx_mgr (filp, &fbo); if (ret) goto err; break ; } case BINDER_VERSION: { struct binder_version __user *ver = ubuf; if (size != sizeof (struct binder_version)) { ret = -EINVAL; goto err; } if (put_user (BINDER_CURRENT_PROTOCOL_VERSION, &ver->protocol_version)) { ret = -EINVAL; goto err; } break ; } return ret; }
copy_from_user函数的目的是从用户空间拷贝数据到内核空间,失败返回没有被拷贝的字节数,成功返回0 .
1 2 3 4 5 6 copy_from_user(void *to, const void __user *from, unsigned long n) 1. *to 将数据拷贝到内核的地址 2. *from 需要拷贝数据的地址 3. n 拷贝数据的长度(字节) 也就是将from地址中的数据拷贝到to地址中去,拷贝长度是n
二. ioctl - BINDER_WRITE_READ 现在万事具备了,我们继续分析进程间的ioctl通信传输数据, 回到最开始:IPCThreadState#talkWithDriver
其实我们在open_driver - 打开binder驱动的过程中就有分析看到ioctl了。
从代码的角度理解为什么说binder跨进程通信只需要一次内存拷贝。
1 2 3 if (ioctl (mProcess->mDriverFD, BINDER_WRITE_READ, &bwr) >= 0 ) err = NO_ERROR;
2.1 binder_ioctl - BINDER_WRITE_READ 1 2 3 4 5 6 7 8 9 10 11 12 13 14 15 16 17 18 19 20 21 22 23 static long binder_ioctl (struct file *filp, unsigned int cmd, unsigned long arg) switch (cmd) { case BINDER_WRITE_READ: ret = binder_ioctl_write_read (filp, cmd, arg, thread); if (ret) goto err; break ; ret = 0 ; err: if (thread) thread->looper_need_return = false ; wait_event_interruptible (binder_user_error_wait, binder_stop_on_user_error < 2 ); if (ret && ret != -ERESTARTSYS) pr_info ("%d:%d ioctl %x %lx returned %d\n" , proc->pid, current->pid, cmd, arg, ret); err_unlocked: trace_binder_ioctl_done (ret); return ret; }
2.2 binder.c:binder_ioctl_write_read 1 2 3 4 5 6 7 8 9 10 11 12 13 14 15 16 17 18 19 20 21 22 23 24 25 26 27 28 29 30 31 32 33 34 35 36 37 38 39 40 41 42 43 44 45 46 47 48 49 50 51 52 53 54 55 56 57 58 59 60 61 62 63 64 65 66 67 68 69 70 71 72 73 static int binder_ioctl_write_read (struct file *filp, unsigned int cmd, unsigned long arg, struct binder_thread *thread) int ret = 0 ; struct binder_proc *proc = filp->private_data; unsigned int size = _IOC_SIZE(cmd); void __user *ubuf = (void __user *)arg; struct binder_write_read bwr; if (size != sizeof (struct binder_write_read)) { ret = -EINVAL; goto out; } if (copy_from_user (&bwr, ubuf, sizeof (bwr))) { ret = -EFAULT; goto out; } binder_debug (BINDER_DEBUG_READ_WRITE, "%d:%d write %lld at %016llx, read %lld at %016llx\n" , proc->pid, thread->pid, (u64)bwr.write_size, (u64)bwr.write_buffer, (u64)bwr.read_size, (u64)bwr.read_buffer); if (bwr.write_size > 0 ) { ret = binder_thread_write (proc, thread, bwr.write_buffer, bwr.write_size, &bwr.write_consumed); trace_binder_write_done (ret); if (ret < 0 ) { bwr.read_consumed = 0 ; if (copy_to_user (ubuf, &bwr, sizeof (bwr))) ret = -EFAULT; goto out; } } if (bwr.read_size > 0 ) { ret = binder_thread_read (proc, thread, bwr.read_buffer, bwr.read_size, &bwr.read_consumed, filp->f_flags & O_NONBLOCK); trace_binder_read_done (ret); binder_inner_proc_lock (proc); if (!binder_worklist_empty_ilocked (&proc->todo)) binder_wakeup_proc_ilocked (proc); binder_inner_proc_unlock (proc); if (ret < 0 ) { if (copy_to_user (ubuf, &bwr, sizeof (bwr))) ret = -EFAULT; goto out; } } binder_debug (BINDER_DEBUG_READ_WRITE, "%d:%d wrote %lld of %lld, read return %lld of %lld\n" , proc->pid, thread->pid, (u64)bwr.write_consumed, (u64)bwr.write_size, (u64)bwr.read_consumed, (u64)bwr.read_size); if (copy_to_user (ubuf, &bwr, sizeof (bwr))) { ret = -EFAULT; goto out; } out: return ret; }
copy_from_user函数的目的是从内核空间拷贝数据到用户空间,失败返回没有被拷贝的字节数,成功返回0.
unsigned long copy_to_user(void *to, const void *from, unsigned long n)
*to 目标地址(用户空间)
*from 源地址(内核空间)
n 将要拷贝数据的字节数
返回:成功返回0,失败返回没有拷贝成功的数据字节数
总结 可以看到用户进程IPCThreadState的初始化之后会将binder驱动与进程内存映射,提供一块虚拟地址空间来接收binder驱动数据。
鉴于 binder_thread_write 和 binder_thread_read 函数都特别大,接下来单开两篇分开论述。
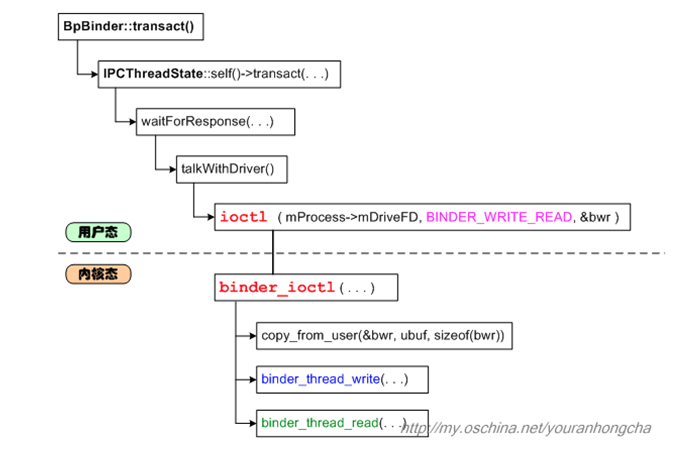
之前看 红茶一杯话Binder(传输机制篇_中) 有一张图特别清晰的展现了这里的流程,在此贴出:
参考资料
module_init解析及内核initcall的初始化顺序 https://www.cnblogs.com/chaozhu/p/6410271.html
各种initcall的执行先后顺序 https://blog.csdn.net/fenzhikeji/article/details/6860143
binder 驱动的操作 https://blog.csdn.net/qq_15893929/article/details/103965668
Android的IPC机制Binder的各个部分 http://tech.it168.com/a2009/0331/2703/000000270388_all.shtml
字符设备驱动-使用alloc_chrdev_region+cdev注册设备驱动 https://blog.csdn.net/weixin_42314225/article/details/81112217
linux文件系统 - 初始化(一) https://www.cnblogs.com/alantu2018/p/8447303.html
mount过程分析之五(mount_bdev->fill_super) https://blog.csdn.net/ZR_Lang/article/details/40115013
VFS四大对象之一 struct super_block https://www.cnblogs.com/linhaostudy/p/7427027.html
Linux字符设备驱动file_operations https://www.cnblogs.com/chen-farsight/p/6181341.html
一种linux线程私有数据技术 http://blog.163.com/william_djj@126/blog/static/3516650120085111193035/
pthread_key_t和pthread_key_create()详解 https://www.cnblogs.com/klcf0220/p/5807148.html
腾讯面试题——谈一谈Binder的原理和实现一次拷贝的流程 https://blog.csdn.net/AndroidStudyDay/article/details/93749470
红茶一杯话Binder(传输机制篇_中) https://my.oschina.net/youranhongcha/blog/152963