以下分析基于Android S.
简述 前面几篇文章中,我们弄清楚了WMS中比较核心的几个类的作用以及初始化等流程。现在我们看看Activity启动时的启动窗口动画过程,以此为锲子剖析WMS相关流程。
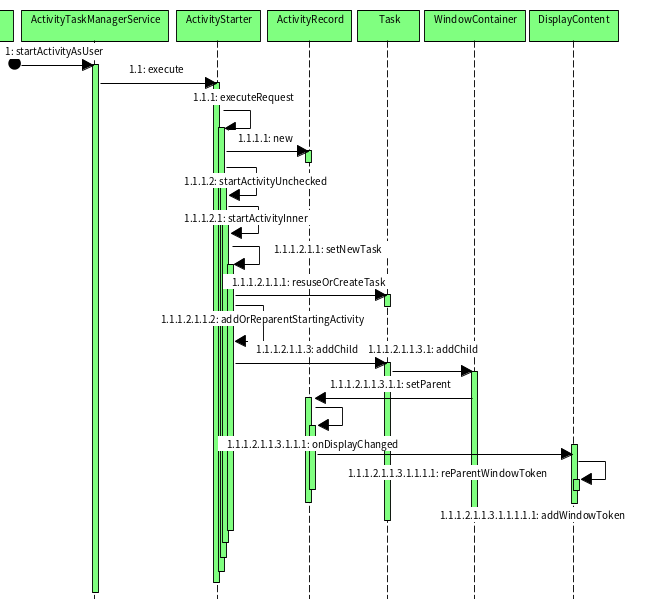
启动窗口,如其名,最合理的地方应该是在Activity启动的时候播放其动画的,回到startActivityInner,开始看:
一. 启动窗口的初始化 1.1 ActivityStarter.startActivityInner 1 2 3 4 5 6 7 8 9 10 int startActivityInner (final ActivityRecord r, ActivityRecord sourceRecord, IVoiceInteractionSession voiceSession, IVoiceInteractor voiceInteractor, int startFlags, boolean doResume, ActivityOptions options, Task inTask, boolean restrictedBgActivity, NeededUriGrants intentGrants) { ...... mTargetRootTask.startActivityLocked(mStartActivity, topRootTask != null ? topRootTask.getTopNonFinishingActivity() : null , newTask, mKeepCurTransition, mOptions, startFromSamePackage); ......
在Activity启动过程中,在创建新的Task并将该ActivityRecord保存其中,之后就是将启动Activity的流程转交给Task继续执行.
1.2 Task.startActivityLocked 1 2 3 4 5 6 7 8 9 10 11 12 13 14 15 16 17 18 19 20 21 22 23 24 25 26 27 28 29 30 31 32 33 34 35 36 37 38 39 40 41 42 43 void startActivityLocked (ActivityRecord r, @Nullable ActivityRecord focusedTopActivity, boolean newTask, boolean keepCurTransition, ActivityOptions options, boolean samePackage) { ...... if ((!isHomeOrRecentsRootTask() || hasActivity()) && allowMoveToFront) { ...... boolean doShow = true ; ...... if (r.mLaunchTaskBehind) { ...... } else if (SHOW_APP_STARTING_PREVIEW && doShow) { Task prevTask = r.getTask(); ActivityRecord prev = prevTask.topActivityWithStartingWindow(); if (prev != null ) { if (prev.getTask() != prevTask) { prev = null ; } else if (prev.nowVisible) { prev = null ; } } final int splashScreenThemeResId = options != null ? options.getSplashScreenThemeResId() : 0 ; r.showStartingWindow(prev, newTask, isTaskSwitch(r, focusedTopActivity), splashScreenThemeResId, samePackage); } ...... } private boolean isTaskSwitch (ActivityRecord r, ActivityRecord topFocusedActivity) { return topFocusedActivity != null && r.getTask() != topFocusedActivity.getTask(); }
Task中执行Activity的启动主要是:
将该Activity对应的ActivityRecord放在该task合适的位置
顺便检查是否需要显示启动窗口,如果需要:
检查是否可以重用启动窗口:
当前Activity和启动窗口不在同一个task时,不会重用启动窗口
当前Activity已经显示出来了,也不会重用启动窗口
显示启动窗口
1.3 ActivityRecord.showStartingWindow 1 2 3 4 5 6 7 8 9 10 11 12 13 14 15 16 17 18 19 20 21 22 23 24 25 26 27 28 29 void showStartingWindow (ActivityRecord prev, boolean newTask, boolean taskSwitch, int splashScreenTheme, boolean samePackage) { if (mTaskOverlay) { return ; } if (mPendingOptions != null && mPendingOptions.getAnimationType() == ActivityOptions.ANIM_SCENE_TRANSITION) { return ; } final CompatibilityInfo compatInfo = mAtmService.compatibilityInfoForPackageLocked(info.applicationInfo); final int resolvedTheme = evaluateStartingWindowTheme(packageName, theme, splashScreenTheme); final boolean shown = addStartingWindow(packageName, resolvedTheme, compatInfo, nonLocalizedLabel, labelRes, icon, logo, windowFlags, prev != null ? prev.appToken : null , newTask, taskSwitch, isProcessRunning(), allowTaskSnapshot(), mState.ordinal() >= STARTED.ordinal() && mState.ordinal() <= STOPPED.ordinal(), samePackage); if (shown) { mStartingWindowState = STARTING_WINDOW_SHOWN; } }
显示启动窗口首先需要检查是否需要显示,以下两种情况不显示启动窗口:
当此Activity为始终处于最上层时
Activity动画类型为ANIM_SCENE_TRANSITION时
然后选择合适窗口主题,添加启动窗口并在成功添加时,标记此ActivityRecord的启动窗口状态为STARTING_WINDOW_SHOWN,意为此Activity已经展示了启动窗口。
1.4 ActivityRecord.addStartingWindow 1 2 3 4 5 6 7 8 9 10 11 12 13 14 15 16 17 18 19 20 21 22 23 24 25 26 27 28 29 30 31 32 33 boolean addStartingWindow (String pkg, int resolvedTheme, CompatibilityInfo compatInfo, CharSequence nonLocalizedLabel, int labelRes, int icon, int logo, int windowFlags, IBinder transferFrom, boolean newTask, boolean taskSwitch, boolean processRunning, boolean allowTaskSnapshot, boolean activityCreated, boolean samePackage) { ...... final int typeParameter = mWmService.mStartingSurfaceController .makeStartingWindowTypeParameter(newTask, taskSwitch, processRunning, allowTaskSnapshot, activityCreated, samePackage); ...... mStartingData = new SplashScreenStartingData (mWmService, pkg, resolvedTheme, compatInfo, nonLocalizedLabel, labelRes, icon, logo, windowFlags, getMergedOverrideConfiguration(), typeParameter); scheduleAddStartingWindow(); return true ; } void scheduleAddStartingWindow () { if (StartingSurfaceController.DEBUG_ENABLE_SHELL_DRAWER) { mAddStartingWindow.run(); } else { if (!mWmService.mAnimationHandler.hasCallbacks(mAddStartingWindow)) { ProtoLog.v(WM_DEBUG_STARTING_WINDOW, "Enqueueing ADD_STARTING" ); mWmService.mAnimationHandler.postAtFrontOfQueue(mAddStartingWindow); } } }
添加启动窗口的动作有很多,忽略细节,主要是封装该启动窗口的相关数据保存在SplashScreenStartingData中,然后执行启动窗口动画。
如果是转交给WMS的动画处理线程执行启动窗口的动画,而且是将该动画放在执行队列最前面执行。
至于WMS的mAnimationHandler是在类创建时初始化的:
1 2 3 4 5 6 7 final Handler mAnimationHandler = new Handler (AnimationThread.getHandler().getLooper());private AnimationThread () { super ("android.anim" , THREAD_PRIORITY_DISPLAY, false ); }
所以mAnimationHandler执行所在的线程就是”android.anim”线程。
该ActivityRecord中的mAddStartingWindow也是类初始化时创建的:
1 2 3 4 5 6 private final AddStartingWindow mAddStartingWindow = new AddStartingWindow ();private class AddStartingWindow implements Runnable { ...... }
二. 启动窗口的动画 2.1 AddStartingWindow.run 1 2 3 4 5 6 7 8 9 10 11 12 13 14 15 16 17 18 19 20 21 22 23 24 25 26 27 28 29 30 31 32 33 34 35 36 37 38 39 40 41 42 43 44 45 46 47 48 @Override public void run () { final StartingData startingData; synchronized (mWmService.mGlobalLock) { ...... if (mStartingData == null ) { ProtoLog.v(WM_DEBUG_STARTING_WINDOW, "startingData was nulled out before handling" + " mAddStartingWindow: %s" , ActivityRecord.this ); return ; } startingData = mStartingData; } ProtoLog.v(WM_DEBUG_STARTING_WINDOW, "Add starting %s: startingData=%s" , this , startingData); WindowManagerPolicy.StartingSurface surface = null ; try { surface = startingData.createStartingSurface(ActivityRecord.this ); } catch (Exception e) { Slog.w(TAG, "Exception when adding starting window" , e); } if (surface != null ) { boolean abort = false ; synchronized (mWmService.mGlobalLock) { if (mStartingData == null ) { ProtoLog.v(WM_DEBUG_STARTING_WINDOW, "Aborted starting %s: startingData=%s" , ActivityRecord.this , mStartingData); mStartingWindow = null ; mStartingData = null ; abort = true ; } else { mStartingSurface = surface; } ...... } if (abort) { surface.remove(false ); } ...... }
AddStartingWindow就是一个runnable, 执行的时候先判断当前启动窗口是否仍需要,如果需要就创建启动窗口的Surface,如果启动窗口被中止,则移除创建的Surface.
2.2 StartingData.createStartingSurface ActivityRecord中的mStartingData就是SplashScreenStartingData类型的对象。SplashScreenStartingData是StartingData的子类。
1 2 3 4 5 6 7 @Override StartingSurface createStartingSurface (ActivityRecord activity) { return mService.mStartingSurfaceController.createSplashScreenStartingSurface( activity, mPkg, mTheme, mCompatInfo, mNonLocalizedLabel, mLabelRes, mIcon, mLogo, mWindowFlags, mMergedOverrideConfiguration, activity.getDisplayContent().getDisplayId()); }
通过WMS中的mStartingSurfaceController来创建StartingSurface, mStartingSurfaceController是在WMS初始化的时候创建,用来管理创建和释放启动窗口Surface。
2.3 StartingSurfaceController.createSplashScreenStartingSurface 1 2 3 4 5 6 7 8 9 10 11 12 13 14 15 16 17 18 StartingSurface createSplashScreenStartingSurface (ActivityRecord activity, String packageName, int theme, CompatibilityInfo compatInfo, CharSequence nonLocalizedLabel, int labelRes, int icon, int logo, int windowFlags, Configuration overrideConfig, int displayId) { ...... synchronized (mService.mGlobalLock) { final Task task = activity.getTask(); if (task != null && mService.mAtmService.mTaskOrganizerController.addStartingWindow( task, activity.token, theme, null )) { return new ShellStartingSurface (task); } } return null ; }
最终创建的Surface是ShellStartingSurface.
2.4 TaskOrganizerController.addStartingWindow 1 2 3 4 5 6 7 8 9 10 11 12 13 14 15 16 17 18 19 20 21 22 23 24 25 26 27 28 29 30 31 32 33 34 35 36 boolean addStartingWindow (Task task, IBinder appToken, int launchTheme, TaskSnapshot taskSnapshot) { final Task rootTask = task.getRootTask(); if (rootTask == null || rootTask.mTaskOrganizer == null ) { return false ; } final TaskOrganizerState state = mTaskOrganizerStates.get(rootTask.mTaskOrganizer.asBinder()); state.addStartingWindow(task, appToken, launchTheme, taskSnapshot); return true ; } private final TaskOrganizerCallbacks mOrganizer;void addStartingWindow (Task t, IBinder appToken, int launchTheme, TaskSnapshot taskSnapshot) { mOrganizer.addStartingWindow(t, appToken, launchTheme, taskSnapshot); } final ITaskOrganizer mTaskOrganizer;void addStartingWindow (Task task, IBinder appToken, int launchTheme, TaskSnapshot taskSnapshot) { final StartingWindowInfo info = task.getStartingWindowInfo(); if (launchTheme != 0 ) { info.splashScreenThemeResId = launchTheme; } info.mTaskSnapshot = taskSnapshot; try { mTaskOrganizer.addStartingWindow(info, appToken); } catch (RemoteException e) { Slog.e(TAG, "Exception sending onTaskStart callback" , e); } }
这里有点绕,我们看看mTaskOrganizer是什么,看看TaskOrganizerCallbacks和TaskOrganizerState的初始化可以知道:
1 2 3 4 5 6 7 8 9 10 11 12 13 14 15 16 17 18 19 20 21 TaskOrganizerCallbacks(ITaskOrganizer taskOrg, Consumer<Runnable> deferTaskOrgCallbacksConsumer) { mDeferTaskOrgCallbacksConsumer = deferTaskOrgCallbacksConsumer; mTaskOrganizer = taskOrg; } TaskOrganizerState(ITaskOrganizer organizer, int uid) { final Consumer<Runnable> deferTaskOrgCallbacksConsumer = mDeferTaskOrgCallbacksConsumer != null ? mDeferTaskOrgCallbacksConsumer : mService.mWindowManager.mAnimator::addAfterPrepareSurfacesRunnable; mOrganizer = new TaskOrganizerCallbacks (organizer, deferTaskOrgCallbacksConsumer); mDeathRecipient = new DeathRecipient (organizer); try { organizer.asBinder().linkToDeath(mDeathRecipient, 0 ); } catch (RemoteException e) { Slog.e(TAG, "TaskOrganizer failed to register death recipient" ); } mUid = uid; }
所以mTaskOrganizer还是TaskOrganizerState初始化时传入的。那么TaskOrganizerState是怎么初始化的:
1 2 3 4 5 6 7 8 9 10 11 12 13 14 15 16 @Override public ParceledListSlice<TaskAppearedInfo> registerTaskOrganizer (ITaskOrganizer organizer) { ...... try { synchronized (mGlobalLock) { ...... if (!mTaskOrganizerStates.containsKey(organizer.asBinder())) { mTaskOrganizers.add(organizer); mTaskOrganizerStates.put(organizer.asBinder(), new TaskOrganizerState (organizer, uid)); } ....... ...... ...... }
所以是有其他进程调用了TaskOrganizerController的registerTaskOrganizer将该成员注册了,而这里的方法仅有TaskOrganizer.java#72调用:
1 2 3 4 5 6 7 8 9 10 11 12 13 14 15 16 17 18 19 20 21 22 23 @RequiresPermission(android.Manifest.permission.MANAGE_ACTIVITY_TASKS) @CallSuper @NonNull public List<TaskAppearedInfo> registerOrganizer () { try { return mTaskOrganizerController.registerTaskOrganizer(mInterface).getList(); } catch (RemoteException e) { throw e.rethrowFromSystemServer(); } } private final ITaskOrganizer mInterface = new ITaskOrganizer .Stub() { @Override public void addStartingWindow (StartingWindowInfo windowInfo, IBinder appToken) { mExecutor.execute(() -> TaskOrganizer.this .addStartingWindow(windowInfo, appToken)); } ...... } @BinderThread public void addStartingWindow (@NonNull StartingWindowInfo info, @NonNull IBinder appToken) {}
所以这个是将启动窗口的信息通过binder调用,添加到实现TaskOrganizer的addStartingWindow方法的其他进程了,并非是系统进程管控。
总的来说AddStartingWindow.run这个就是做了两件事:
创建启动窗口Surface, 即ShellStartingSurface
将启动窗口信息通过binder调用传递给实现TaskOrganizer的进程
这里的流程和R的差异有点大,推测是Google希望启动窗口可以交给Launcher或者SystemUI实现,而不是由framework的system_server进程来管控。
搜索SystemUI源码可以发现,继承TaskOrganizer的类有一个:ShellTaskOrganizer!
2.5 ShellTaskOrganizer.addStartingWindow 1 2 3 4 5 6 @Override public void addStartingWindow (StartingWindowInfo info, IBinder appToken) { if (mStartingWindow != null ) { mStartingWindow.addStartingWindow(info, appToken); } }
看来Google还真是将启动窗口交给SystemUI模块了。
三. SystemUI负责的启动窗口 上面我们知道一个Activity启动后,从App进程交给SystemServer处理,在创建该Activity的ActivityRecord, 并将其保存在对应的Task之后,会在需要的时候开始启动窗口的播放。
启动窗口在Android S上是交给SystemUI进程负责了,在以前是交给SystemServer的“android.anim”线程处理。
关于R上SystemUI的ShellTaskOrganizer这一块涉及到Dagger2, 是一款基于 Java 注解来实现的在编译阶段完成依赖注入的开源库 的使用,这里先不展开讲了,感兴趣的可以自行研究。
ShellTaskOrganizer中的mStartingWindow是StartingWindowController类对象。
3.1 StartingWindowController.addStartingWindow 1 2 3 4 5 6 7 8 9 10 11 12 13 14 15 16 17 18 19 20 21 22 23 24 25 26 27 public void addStartingWindow (StartingWindowInfo windowInfo, IBinder appToken) { mSplashScreenExecutor.execute(() -> { Trace.traceBegin(TRACE_TAG_WINDOW_MANAGER, "addStartingWindow" ); final int suggestionType = mStartingWindowTypeAlgorithm.getSuggestedWindowType( windowInfo); final RunningTaskInfo runningTaskInfo = windowInfo.taskInfo; if (mTaskLaunchingCallback != null && shouldSendToListener(suggestionType)) { mTaskLaunchingCallback.accept(runningTaskInfo.taskId, suggestionType); } if (suggestionType == STARTING_WINDOW_TYPE_SPLASH_SCREEN) { mStartingSurfaceDrawer.addSplashScreenStartingWindow(windowInfo, appToken, false ); } else if (suggestionType == STARTING_WINDOW_TYPE_EMPTY_SPLASH_SCREEN) { mStartingSurfaceDrawer.addSplashScreenStartingWindow(windowInfo, appToken, true ); } else if (suggestionType == STARTING_WINDOW_TYPE_SNAPSHOT) { final TaskSnapshot snapshot = windowInfo.mTaskSnapshot; mStartingSurfaceDrawer.makeTaskSnapshotWindow(windowInfo, appToken, snapshot); } else { } Trace.traceEnd(TRACE_TAG_WINDOW_MANAGER); }); }
根据启动窗口类型选择不同的启动窗口,这里我们假设是STARTING_WINDOW_TYPE_SPLASH_SCREEN类型。
3.2 StartingSurfaceDrawer.addSplashScreenStartingWindow 1 2 3 4 5 6 7 8 9 10 11 12 13 14 15 16 17 18 19 20 21 22 23 24 25 26 27 28 29 30 31 32 33 34 35 36 37 38 39 40 41 42 43 44 45 46 47 48 49 50 51 52 53 54 55 56 57 58 59 60 61 void addSplashScreenStartingWindow (StartingWindowInfo windowInfo, IBinder appToken, boolean emptyView) { final RunningTaskInfo taskInfo = windowInfo.taskInfo; final ActivityInfo activityInfo = taskInfo.topActivityInfo; ...... Context context = mContext; ...... final int [] splashscreenContentResId = new int [1 ]; getWindowResFromContext(context, a -> { splashscreenContentResId[0 ] = a.getResourceId(R.styleable.Window_windowSplashscreenContent, 0 ); showWallpaper[0 ] = a.getBoolean(R.styleable.Window_windowShowWallpaper, false ); }); ...... final PhoneWindow win = new PhoneWindow (context); win.setIsStartingWindow(true ); ...... win.setType(WindowManager.LayoutParams.TYPE_APPLICATION_STARTING); ...... win.setLayout(WindowManager.LayoutParams.MATCH_PARENT, WindowManager.LayoutParams.MATCH_PARENT); final WindowManager.LayoutParams params = win.getAttributes(); params.token = appToken; params.packageName = activityInfo.packageName; ...... params.setTitle("Splash Screen " + activityInfo.packageName); final SplashScreenViewSupplier viewSupplier = new SplashScreenViewSupplier (); final Runnable setViewSynchronized = () -> { SplashScreenView contentView = viewSupplier.get(); ...... win.setContentView(contentView); contentView.cacheRootWindow(win); ...... } mSplashscreenContentDrawer.createContentView(context, emptyView, splashscreenContentResId[0 ], activityInfo, taskId, viewSupplier::setView); ...... final View view = win.getDecorView(); final WindowManager wm = mContext.getSystemService(WindowManager.class); postAddWindow(taskId, appToken, view, wm, params); mChoreographer.postCallback(CALLBACK_INSETS_ANIMATION, setViewSynchronized, null ); } protected void postAddWindow (int taskId, IBinder appToken, View view, WindowManager wm, WindowManager.LayoutParams params) { ...... wm.addView(view, params); ...... }
这里创建启动窗口对应的PhoneWindow以及设置相关的参数,并将启动窗口的DecorView和窗口属性通过binder传给WMS用来创建对应的WindowState,最后通过Choreographer请求vsync,在下一帧的时候设置该启动窗口的内容。
3.3 SplashscreenContentDrawer.createContentView 1 2 3 4 5 6 7 8 9 10 11 12 13 14 15 16 17 18 19 20 21 22 23 24 25 26 27 28 29 void createContentView (Context context, boolean emptyView, int splashScreenResId, ActivityInfo info, int taskId, Consumer<SplashScreenView> consumer) { mSplashscreenWorkerHandler.post(() -> { SplashScreenView contentView; try { contentView = SplashscreenContentDrawer.makeSplashscreenContent( context, splashScreenResId); if (contentView == null ) { Trace.traceBegin(TRACE_TAG_WINDOW_MANAGER, "makeSplashScreenContentView" ); if (emptyView) { contentView = makeEmptySplashScreenContentView(context); } else { contentView = makeSplashScreenContentView(context, info); } Trace.traceEnd(TRACE_TAG_WINDOW_MANAGER); } } catch (RuntimeException e) { Slog.w(TAG, "failed creating starting window content at taskId: " + taskId, e); contentView = null ; } consumer.accept(contentView); }); }
这里是创建启动窗口显示的内容,首先通过SplashscreenContentDrawer创建SplashScreenView.
3.3.1 SplashscreenContentDrawer.makeSplashscreenContent 1 2 3 4 5 6 7 8 9 10 private static SplashScreenView makeSplashscreenContent (Context ctx, int splashscreenContentResId) { final int targetSdkVersion = ctx.getApplicationInfo().targetSdkVersion; if (targetSdkVersion >= Build.VERSION_CODES.S) { return null ; } ...... }
Andriod S之后不支持Window_windowSplashscreenContent了.
3.3.2 SplashscreenContentDrawer.makeSplashScreenContentView 1 2 3 4 5 6 7 8 9 10 11 12 13 14 15 16 17 18 19 20 21 22 23 24 25 26 27 28 29 30 31 32 private SplashScreenView makeSplashScreenContentView (Context context, ActivityInfo ai) { updateDensity(); getWindowAttrs(context, mTmpAttrs); final StartingWindowViewBuilder builder = new StartingWindowViewBuilder (); final int animationDuration; Drawable iconDrawable; if (mTmpAttrs.mReplaceIcon != null ) { iconDrawable = mTmpAttrs.mReplaceIcon; animationDuration = Math.max(0 , Math.min(mTmpAttrs.mAnimationDuration, mMaxAnimatableIconDuration)); } else { iconDrawable = mIconProvider.getIconForUI( ai, getUserHandleForUid(ai.applicationInfo.uid)); if (iconDrawable == null ) { iconDrawable = context.getPackageManager().getDefaultActivityIcon(); } animationDuration = 0 ; } final int themeBGColor = peekWindowBGColor(context); return builder .setContext(context) .setWindowBGColor(themeBGColor) .setIconDrawable(iconDrawable) .setIconAnimationDuration(animationDuration) .setBrandingDrawable(mTmpAttrs.mBrandingImage) .setIconBackground(mTmpAttrs.mIconBgColor).build(); }
这里首先重置相关配置属性,然后根据默认配置创建SplashScreenView。
3.3.3 StartingWindowViewBuilder.build 1 2 3 4 5 6 7 8 9 10 11 12 13 14 15 SplashScreenView build () { ...... if (!processAdaptiveIcon() && mIconDrawable != null ) { if (DEBUG) { Slog.d(TAG, "The icon is not an AdaptiveIconDrawable" ); } createIconDrawable(mIconDrawable, mIconSize); } final int iconSize = mFinalIconDrawable != null ? (int ) (mIconSize * mScale) : 0 ; mCachedResult = fillViewWithIcon(mContext, iconSize, mFinalIconDrawable); mBuildComplete = true ; return mCachedResult; }
这里也仅仅是检查了下mIconDrawable是否为AdaptiveIconDrawable的实例,如果不是则重新创建一个。然后使用fillViewWithIcon填充内容,创建SplashScreenView.
3.3.4 StartingWindowViewBuilder.fillViewWithIcon 1 2 3 4 5 6 7 8 9 10 11 12 13 14 15 16 17 18 19 20 21 22 23 private SplashScreenView fillViewWithIcon (Context context, int iconSize, Drawable iconDrawable) { Trace.traceBegin(TRACE_TAG_WINDOW_MANAGER, "fillViewWithIcon" ); final SplashScreenView.Builder builder = new SplashScreenView .Builder(context); builder.setIconSize(iconSize).setBackgroundColor(mThemeColor) .setIconBackground(mIconBackground); if (iconDrawable != null ) { builder.setCenterViewDrawable(iconDrawable); } builder.setAnimationDurationMillis(mIconAnimationDuration); if (mBrandingDrawable != null ) { builder.setBrandingDrawable(mBrandingDrawable, mBrandingImageWidth, mBrandingImageHeight); } final SplashScreenView splashScreenView = builder.build(); if (DEBUG) { Slog.d(TAG, "fillViewWithIcon surfaceWindowView " + splashScreenView); } splashScreenView.makeSystemUIColorsTransparent(); Trace.traceEnd(TRACE_TAG_WINDOW_MANAGER); return splashScreenView; }
设置待创建的SplashScreenView相关的内容,如主题颜色、图标背景色、图标动画时长、三方应用的图标等等,然后通过build构建SplashScreenView.
3.3.5 SplashScreenView.Builder.build 1 2 3 4 5 6 7 8 9 10 11 12 13 14 15 16 17 18 19 20 21 22 23 24 25 public SplashScreenView build () { Trace.traceBegin(TRACE_TAG_WINDOW_MANAGER, "SplashScreenView#build" ); final LayoutInflater layoutInflater = LayoutInflater.from(mContext); final SplashScreenView view = (SplashScreenView) layoutInflater.inflate(R.layout.splash_screen_view, null , false ); ...... view.mIconView = view.findViewById(R.id.splashscreen_icon_view); view.mBrandingImageView = view.findViewById(R.id.splashscreen_branding_view); ...... if (mIconDrawable != null ) { view.mIconView.setBackground(mIconDrawable); view.initIconAnimation(mIconDrawable, mIconAnimationDuration != null ? mIconAnimationDuration.toMillis() : 0 ); } ...... if (mBrandingImageHeight > 0 && mBrandingImageWidth > 0 && mBrandingDrawable != null ) { ...... view.mBrandingImageView.setBackground(mBrandingDrawable); } ...... Trace.traceEnd(TRACE_TAG_WINDOW_MANAGER); return view; }
SplashScreenView是继承FrameLayout的,通过LayoutInflater实例化splash_screen_view作为其内容布局:
1 2 3 4 5 6 7 8 9 10 11 12 13 14 15 16 17 18 19 20 <android.window.SplashScreenView xmlns:android ="http://schemas.android.com/apk/res/android" android:layout_height ="match_parent" android:layout_width ="match_parent" android:orientation ="vertical" > <View android:id ="@+id/splashscreen_icon_view" android:layout_height ="wrap_content" android:layout_width ="wrap_content" android:layout_gravity ="center" android:contentDescription ="@string/splash_screen_view_icon_description" /> <View android:id ="@+id/splashscreen_branding_view" android:layout_height ="wrap_content" android:layout_width ="wrap_content" android:layout_gravity ="center_horizontal|bottom" android:layout_marginBottom ="60dp" android:contentDescription ="@string/splash_screen_view_branding_description" /> </android.window.SplashScreenView >
这个非常简单,就是两个View, 所以说启动窗口的显示内容就是两个图标(如果有图标对应的image不为null,则会显示)。
3.4 SplashScreenViewSupplier.setView 1 2 3 4 5 6 7 8 9 10 11 12 13 14 15 16 17 18 19 20 21 22 23 24 25 private static class SplashScreenViewSupplier implements Supplier <SplashScreenView> { private SplashScreenView mView; private boolean mIsViewSet; void setView (SplashScreenView view) { synchronized (this ) { mView = view; mIsViewSet = true ; notify(); } } @Override public @Nullable SplashScreenView get () { synchronized (this ) { while (!mIsViewSet) { try { wait(); } catch (InterruptedException ignored) { } } return mView; } } }
这个类的主要作用就是将SplashScreenView的创建交给与使用线程不同的线程。
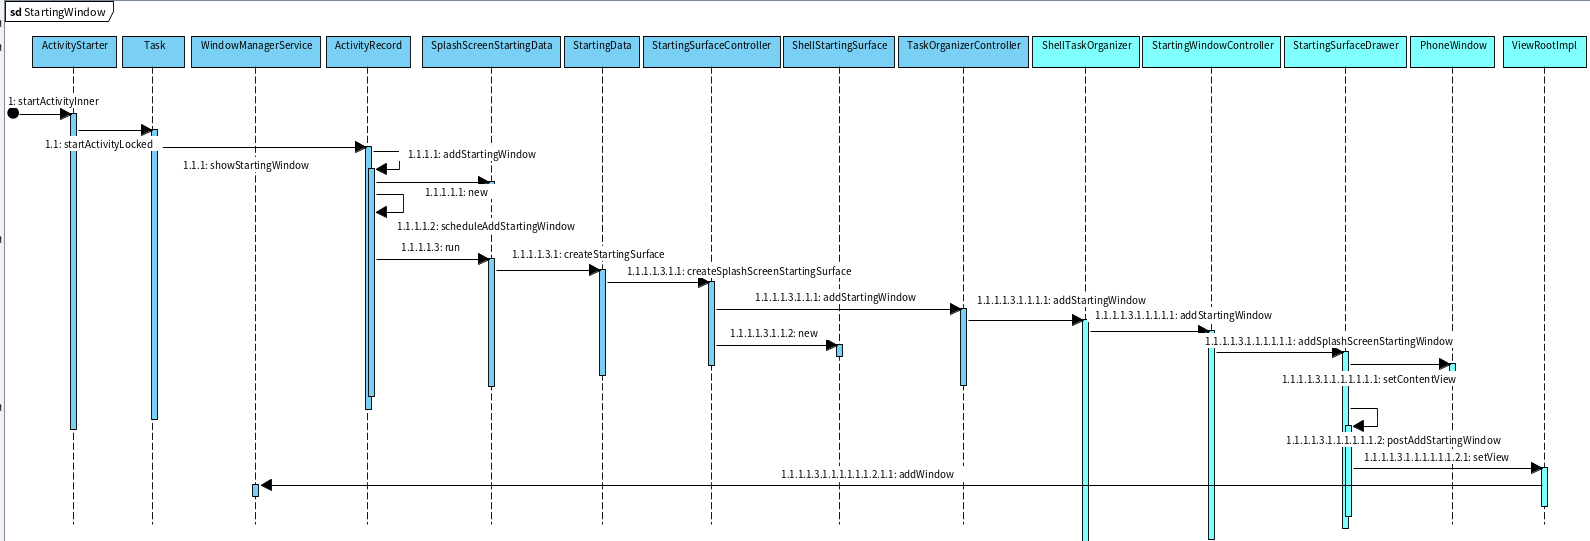
四.小结 来一张流程图回顾下启动窗口被添加的过程:
虽然启动窗口对应的View和内容是通过SystemUI创建的,但是其还是被WMS归属为待启动的Activity的Task中的一员。究其原因还是其窗口属性中的token是该Activity对应的ActivityRecord.Token。SystemUI创建启动窗口的内容后,会在下一帧来时将该View添加到WMS中,然后WMS就会在addWindow里创建对应的WindowState。