简述 本文详细分析android的消息机制Looper的底层原理。
以下分析基于Android S.
初学Android的时候, 比较容易遇到如下错误:
1
2
3
4
5
6
7
E AndroidRuntime: FATAL EXCEPTION: 非UI线程 E AndroidRuntime: Process: com.android.demo, PID: 23939 E AndroidRuntime: android.view.ViewRootImpl$CalledFromWrongThreadException: Only the original thread that created a view hierarchy can touch its views. E AndroidRuntime: at android.view.ViewRootImpl.checkThread(ViewRootImpl.java:9587) E AndroidRuntime: at android.view.ViewRootImpl.requestLayout(ViewRootImpl.java:1894) ...... E AndroidRuntime: at java.lang.Thread.run(Thread.java:923)
往往是我们在非UI线程更新UI组件导致的。解决的方案也很简单,将更新组件的操作移入UI线程执行即可。此时就需要用到Android中非常基础又非常重要的Handler、Looper、Message这三个类:
1
2
3
4
5
6
7
8
9
10
11
12
13
14
15
16
17
18
19
var uiHandler = UiHandler(Looper.getMainLooper())val message = uiHandler.obtainMessage(MSG_UPDATE_UI)message.obj = "我在UI线程中更新UI组件哦!" uiHandler.sendMessage(message) companion object { const val MSG_UPDATE_UI = 0x1 } inner class UiHandler override fun handleMessage (msg: Message ) super .handleMessage(msg) when (msg.what) { MSG_UPDATE_UI -> { textview.text = msg.obj as String } } } }
如上,设置Handler的Looper为MainLooper,然后通过sendMessage将封装数据的Message发送到MainLooper代表的UI线程中处理,就这样切换了线程。接下来我们研究下其中的原理,为什么Looper有main looper, Handler的sendMessage是怎么找到对应线程,然后调用handleMessage的。
或者通过Looper prepare的方式, 其实也是获取主线程的Looper实现的:
1
2
3
4
5
6
7
8
9
10
11
12
13
14
15
16
17
18
19
20
21
class Keep extends Thread { public static final int MSG_A = 0x00 ; public static final int MSG_B = 0x00 ; public Handler handler; @Override public void run () { Looper.prepare(); handler = new Handler () { @Override public void handleMessage (Message msg) { switch (msg.what) { case MSG_A: { } break ; case MSG_B: { } break ; } } }; Looper.loop(); } }
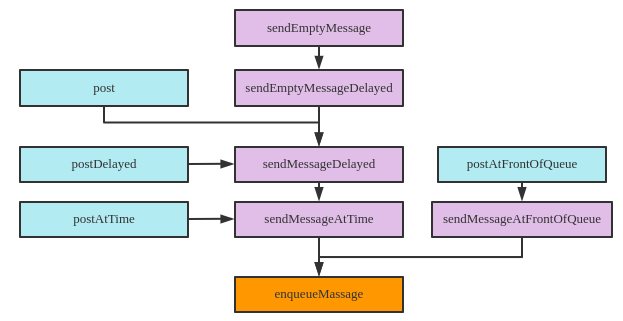
这样我们在需要的时候执行: handler.sendMessage(handler.obtain(MSG_A)) 即可以实现线程交换了, 除了sendMessage,还有如下方式:
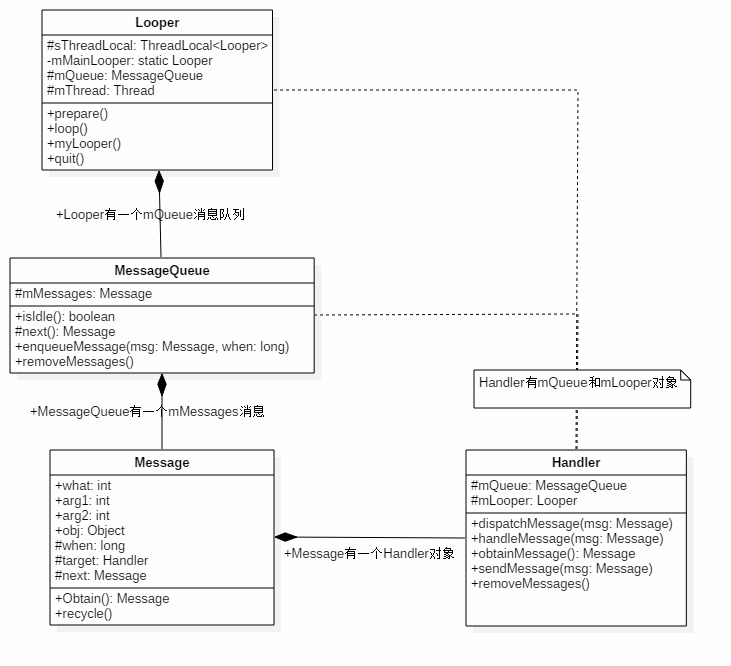
Android系统中大量使用Message来进行跨线程通信,实现交互,设计四个类:Message、Handler、Looper和MessageQueue, 类图如下:
Message: 消息,封装待传递的数据
Handler: 消息辅助类,向消息池(MessageQueue)中存入消息和接收消息进行处理
Looper: 如其名,封装一个不断循环的函数体,不停的从消息池(MessageQueue)中取出合适的消息交给Handler处理
MessageQueue: 消息池,维护了一个由消息组成的链表,该链表按照消息执行的时间顺序排列
我们首先看看UI线程的Looper获取:Looper.getMainLooper()
一. Main Looper的创建 1.1 Looper.getMainLooper 1 2 3 4 5 public static Looper getMainLooper () { synchronized (Looper.class) { return sMainLooper; } }
返回的就是Looper中静态变量sMainLooper。那么该sMainLooper是何时创建的呢:
1.2 sMainLooper 1 2 3 4 5 6 7 8 9 10 11 public static void prepareMainLooper () { prepare(false ); synchronized (Looper.class) { if (sMainLooper != null ) { throw new IllegalStateException ("The main Looper has already been prepared." ); } sMainLooper = myLooper(); } }
sMainLooper是在Looper.prepareMainLooper被第一次调用 时赋值的。而prepareMainLooper是在ActivityThread.main函数中调用的:
1 2 3 4 5 6 7 8 9 public static void main (String[] args) { ...... Looper.prepareMainLooper(); ...... Looper.loop(); throw new RuntimeException ("Main thread loop unexpectedly exited" ); }
在Zygote启动进程时,进程的入口函数是ActivityThread.main,也就是说三方进程启动后第一时间就会调用Looper.prepareMainLooper()设置sMainLooper。
1.2.1 Looper.prepare 1 2 3 4 5 6 7 8 9 10 11 12 public static void prepare () { prepare(true ); } private static void prepare (boolean quitAllowed) { if (sThreadLocal.get() != null ) { throw new RuntimeException ("Only one Looper may be created per thread" ); } sThreadLocal.set(new Looper (quitAllowed)); }
quitAllowed 这个参数表明该Looper是否允许退出,自然UI线程(主线程)是不允许退出的,除非被kill或者进程自杀。
这里稍微提一下,sThreadLocal是ThreadLocal类型,实现了线程本地存储区(Thread Local Storage, 简称TLS)。每个线程都有自己私有的存储区域,不同线程之间彼此不能访问对方的TSL区域。简单来说,可以将这里的 sThreadLocal 视为一个Map集合,其中key为Thread, value是Looper , 每次set和get都是获取当前线程对应的Looper
1.2.2 Looper 的创建 1 2 3 4 5 private Looper (boolean quitAllowed) { mQueue = new MessageQueue (quitAllowed); mThread = Thread.currentThread(); }
简单的创建了一个MessageQueue,并保存创建该Looper的线程。
1.2.3 Looper.myLooper 1 2 3 public static @Nullable Looper myLooper () { return sThreadLocal.get(); }
通过sThreadLocal获取当前线程对应的Looper.
1.3 Looper.loop 1 2 3 4 5 6 7 8 9 10 11 12 13 14 15 16 17 18 19 20 21 22 23 24 25 26 public static void loop () { final Looper me = myLooper(); if (me == null ) { throw new RuntimeException ("No Looper; Looper.prepare() wasn't called on this thread." ); } final int thresholdOverride = SystemProperties.getInt("log.looper." + Process.myUid() + "." + Thread.currentThread().getName() + ".slow" , 0 ); me.mSlowDeliveryDetected = false ; for (;;) { if (!loopOnce(me, ident, thresholdOverride)) { return ; } } }
loop()函数很简单,就一直循环执行loopOnce就可
1.4 Looper.loopOnce 1 2 3 4 5 6 7 8 9 10 11 12 13 14 15 16 17 18 19 20 21 22 23 24 25 26 27 28 29 30 31 32 33 34 35 36 37 38 39 40 41 42 43 44 45 46 47 48 49 50 51 52 53 54 55 56 57 58 59 60 61 62 63 64 65 66 67 68 69 70 71 72 73 74 75 76 77 78 79 80 81 82 83 84 85 86 87 88 89 90 91 92 93 94 95 96 97 98 99 100 private static boolean loopOnce (final Looper me, final long ident, final int thresholdOverride) { Message msg = me.mQueue.next(); if (msg == null ) { return false ; } final Printer logging = me.mLogging; if (logging != null ) { logging.println(">>>>> Dispatching to " + msg.target + " " + msg.callback + ": " + msg.what); } final Observer observer = sObserver; final long traceTag = me.mTraceTag; long slowDispatchThresholdMs = me.mSlowDispatchThresholdMs; long slowDeliveryThresholdMs = me.mSlowDeliveryThresholdMs; if (thresholdOverride > 0 ) { slowDispatchThresholdMs = thresholdOverride; slowDeliveryThresholdMs = thresholdOverride; } final boolean logSlowDelivery = (slowDeliveryThresholdMs > 0 ) && (msg.when > 0 ); final boolean logSlowDispatch = (slowDispatchThresholdMs > 0 ); final boolean needStartTime = logSlowDelivery || logSlowDispatch; final boolean needEndTime = logSlowDispatch; if (traceTag != 0 && Trace.isTagEnabled(traceTag)) { Trace.traceBegin(traceTag, msg.target.getTraceName(msg)); } final long dispatchStart = needStartTime ? SystemClock.uptimeMillis() : 0 ; final long dispatchEnd; Object token = null ; if (observer != null ) { token = observer.messageDispatchStarting(); } long origWorkSource = ThreadLocalWorkSource.setUid(msg.workSourceUid); try { msg.target.dispatchMessage(msg); if (observer != null ) { observer.messageDispatched(token, msg); } dispatchEnd = needEndTime ? SystemClock.uptimeMillis() : 0 ; } catch (Exception exception) { if (observer != null ) { observer.dispatchingThrewException(token, msg, exception); } throw exception; } finally { ThreadLocalWorkSource.restore(origWorkSource); if (traceTag != 0 ) { Trace.traceEnd(traceTag); } } if (logSlowDelivery) { if (me.mSlowDeliveryDetected) { if ((dispatchStart - msg.when) <= 10 ) { Slog.w(TAG, "Drained" ); me.mSlowDeliveryDetected = false ; } } else { if (showSlowLog(slowDeliveryThresholdMs, msg.when, dispatchStart, "delivery" , msg)) { me.mSlowDeliveryDetected = true ; } } } if (logSlowDispatch) { showSlowLog(slowDispatchThresholdMs, dispatchStart, dispatchEnd, "dispatch" , msg); } if (logging != null ) { logging.println("<<<<< Finished to " + msg.target + " " + msg.callback); } ...... msg.recycleUnchecked(); return true ; }
loopOnce函数看起来也很简单,一直从MessageQueue中获取Message并执行Handler.handleMessage函数。除非拿到的message是null时返回false,否则永远返回true。
delivery: 消息被拿出准备分发的时间与消息期望被执行的时间差
dispatch: 消息处理的总时间,即handle.dispatchMessage的执行时长
1.4.1 Handler.dispatchMessage 1 2 3 4 5 6 7 8 9 10 11 12 13 public void dispatchMessage (@NonNull Message msg) { if (msg.callback != null ) { handleCallback(msg); } else { if (mCallback != null ) { if (mCallback.handleMessage(msg)) { return ; } } handleMessage(msg); } }
我们知道在Handler.handleMessage这里已经转到Handler对应Looper所在的线程了。这样看起来,线程切换的奥秘都被隐藏在MessageQueue中了。
二. Message 在分析MessageQueue之前,简单看一下Message的设计。
变量
类型
作用
what
int
标明消息类别
arg1
int
参数1
arg2
int
参数2
obj
Object
消息内容
when
long
消息期望触发时间
data
Bundle
消息附带内容
target
Handler
消息触发执行的Handler
callback
Runnable
消息执行的Runnable
next
Message
下一个消息, 消息链表结构基础
2.1 消息链表结构 1 2 3 4 5 6 7 8 9 10 11 12 13 14 15 16 17 18 19 20 21 22 23 @UnsupportedAppUsage Message next; public static final Object sPoolSync = new Object ();private static Message sPool;private static int sPoolSize = 0 ;private static final int MAX_POOL_SIZE = 50 ;public static Message obtain () { synchronized (sPoolSync) { if (sPool != null ) { Message m = sPool; sPool = m.next; m.next = null ; m.flags = 0 ; sPoolSize--; return m; } } return new Message (); }
通过维护一个大小为50的Message缓冲池,来缓解Message频繁创建销毁带来的资源损耗,所以在开发过程中尽可能选择使用obtain来创建Message。
三. MessageQueue 既然Message自己就维护了一个链表结构,还需要MessageQueue做什么呢?
3.1 MessageQueue 1 2 3 4 5 MessageQueue(boolean quitAllowed) { mQuitAllowed = quitAllowed; mPtr = nativeInit(); }
设置mQuitAllowed, 主线程的Looper不允许退出(调用quit,主动退出)。然后通过JNI进入native层初始化
3.2 android_os_MessageQueue_nativeInit 1 2 3 4 5 6 7 8 9 10 static jlong android_os_MessageQueue_nativeInit (JNIEnv* env, jclass clazz) NativeMessageQueue* nativeMessageQueue = new NativeMessageQueue (); if (!nativeMessageQueue) { jniThrowRuntimeException (env, "Unable to allocate native queue" ); return 0 ; } nativeMessageQueue->incStrong (env); return reinterpret_cast <jlong>(nativeMessageQueue); }
也就是创建了一个NativeMessageQueue的对象。
3.3 NativeMessageQueue 1 2 3 4 5 6 7 8 9 10 11 NativeMessageQueue::NativeMessageQueue () : mPollEnv (NULL ), mPollObj (NULL ), mExceptionObj (NULL ) { mLooper = Looper::getForThread (); if (mLooper == NULL ) { mLooper = new Looper (false ); Looper::setForThread (mLooper); } }
3.4 Looper.cpp 1 2 3 4 5 6 7 8 9 10 11 12 13 14 15 16 17 18 Looper::Looper (bool allowNonCallbacks) : mAllowNonCallbacks (allowNonCallbacks), mSendingMessage (false ), mPolling (false ), mEpollRebuildRequired (false ), mNextRequestSeq (0 ), mResponseIndex (0 ), mNextMessageUptime (LLONG_MAX) { mWakeEventFd.reset (eventfd (0 , EFD_NONBLOCK | EFD_CLOEXEC)); LOG_ALWAYS_FATAL_IF (mWakeEventFd.get () < 0 , "Could not make wake event fd: %s" , strerror (errno)); AutoMutex _l(mLock); rebuildEpollLocked (); }
eventfd 是 Linux 的一个系统调用,创建一个文件描述符用于事件通知,自 Linux 2.6.22 以后开始支持。该函数会创建一个 eventfd 对象,用户空间的应用程序可以用这个 eventfd 来实现事件的等待或通知机制,也可以用于内核通知新的事件到用户空间应用程序。
看来初始化该Looper的线程是通过这个eventfd来实现被唤醒的。
3.4.1 Looper.cpp:rebuildEpollLocked 1 2 3 4 5 6 7 8 9 10 11 12 13 14 15 16 17 18 19 20 21 22 23 24 25 26 27 28 29 30 31 32 33 void Looper::rebuildEpollLocked () if (mEpollFd >= 0 ) { mEpollFd.reset (); } mEpollFd.reset (epoll_create1 (EPOLL_CLOEXEC)); LOG_ALWAYS_FATAL_IF (mEpollFd < 0 , "Could not create epoll instance: %s" , strerror (errno)); struct epoll_event eventItem; memset (& eventItem, 0 , sizeof (epoll_event)); eventItem.events = EPOLLIN; eventItem.data.fd = mWakeEventFd.get (); int result = epoll_ctl (mEpollFd.get (), EPOLL_CTL_ADD, mWakeEventFd.get (), &eventItem); LOG_ALWAYS_FATAL_IF (result != 0 , "Could not add wake event fd to epoll instance: %s" , strerror (errno)); for (size_t i = 0 ; i < mRequests.size (); i++) { const Request& request = mRequests.valueAt (i); struct epoll_event eventItem; request.initEventItem (&eventItem); int epollResult = epoll_ctl (mEpollFd.get (), EPOLL_CTL_ADD, request.fd, &eventItem); if (epollResult < 0 ) { ALOGE ("Error adding epoll events for fd %d while rebuilding epoll set: %s" , request.fd, strerror (errno)); } } }
这里主要是创建了一个epoll实例,并将该Looper的mWakeEventFd(即eventfd)关联到该epoll实例上。如果该Looper的mRequests存在Request时,也对所有mRequests的fd进行重定向, 均关联到新创建的epoll实例上。
所以MessageQueue的初始化就是在Native层创建了一个NativeMessageQueue的对象,该对象持有一个Native层的Looper对象。而Native层的Looper里有两个文件描述符:
通过eventfd创建的mWakeEventFd;
通过epoll_create1创建的代表epoll实例的mEpollFd。
四. sendMessageAtTime发送消息 现在回到Handler发送消息,假设Handler中的Looper是MainLooper, 现在是在非UI线程,比如bg线程读取网络数据后更新到UI组件上:uiHandler.sendMessageAtTime
1 2 3 4 5 6 7 8 9 10 11 12 13 14 15 16 17 18 19 20 21 22 23 24 public boolean sendMessageAtTime (@NonNull Message msg, long uptimeMillis) { MessageQueue queue = mQueue; if (queue == null ) { RuntimeException e = new RuntimeException ( this + " sendMessageAtTime() called with no mQueue" ); Log.w("Looper" , e.getMessage(), e); return false ; } return enqueueMessage(queue, msg, uptimeMillis); } private boolean enqueueMessage (@NonNull MessageQueue queue, @NonNull Message msg, long uptimeMillis) { msg.target = this ; msg.workSourceUid = ThreadLocalWorkSource.getUid(); if (mAsynchronous) { msg.setAsynchronous(true ); } return queue.enqueueMessage(msg, uptimeMillis); }
4.1 MessageQueue.enqueueMessage 1 2 3 4 5 6 7 8 9 10 11 12 13 14 15 16 17 18 19 20 21 22 23 24 25 26 27 28 29 30 31 32 33 34 35 36 37 38 39 40 41 42 43 44 45 46 boolean enqueueMessage (Message msg, long when) { ...... synchronized (this ) { ...... msg.markInUse(); msg.when = when; Message p = mMessages; boolean needWake; if (p == null || when == 0 || when < p.when) { msg.next = p; mMessages = msg; needWake = mBlocked; } else { needWake = mBlocked && p.target == null && msg.isAsynchronous(); Message prev; for (;;) { prev = p; p = p.next; if (p == null || when < p.when) { break ; } if (needWake && p.isAsynchronous()) { needWake = false ; } } msg.next = p; prev.next = msg; } if (needWake) { nativeWake(mPtr); } } return true ; }
所以Handler.sendMessage仅仅是将Message插入MessageQueue中Message链表的合适位置,即保持mMessages链表中的Message期望执行时间从小到大排列,等待执行。
4.2 android_os_MessageQueue_nativeWake 1 2 3 4 5 6 7 8 static void android_os_MessageQueue_nativeWake (JNIEnv* env, jclass clazz, jlong ptr) NativeMessageQueue* nativeMessageQueue = reinterpret_cast <NativeMessageQueue*>(ptr); nativeMessageQueue->wake (); } void NativeMessageQueue::wake () mLooper->wake (); }
转到native层的loop执行。
4.3 Looper.cpp:wake 1 2 3 4 5 6 7 8 9 10 11 void Looper::wake () uint64_t inc = 1 ; ssize_t nWrite = TEMP_FAILURE_RETRY (write (mWakeEventFd.get (), &inc, sizeof (uint64_t ))); if (nWrite != sizeof (uint64_t )) { if (errno != EAGAIN) { LOG_ALWAYS_FATAL ("Could not write wake signal to fd %d (returned %zd): %s" , mWakeEventFd.get (), nWrite, strerror (errno)); } } }
到这里,bg线程中uiHandler发送Message的流程就结束了。
五. UI线程处理Message 那么此时我们UI线程在做什么呢? 对了,就是一直在循环执行 Looper中的 loopOnce 函数!
1 2 3 4 5 6 private static boolean loopOnce (final Looper me, final long ident, final int thresholdOverride) { Message msg = me.mQueue.next(); ...... }
5.1 MessageQueue.next 1 2 3 4 5 6 7 8 9 10 11 Message next () { ...... int pendingIdleHandlerCount = -1 ; int nextPollTimeoutMillis = 0 ; for (;;) { ...... nativePollOnce(ptr, nextPollTimeoutMillis); ...... } }
直接转到native层执行pollOnce.
5.2 android_os_MessageQueue_nativePollOnce 1 2 3 4 5 6 7 8 9 10 11 12 13 14 15 16 17 18 19 20 static void android_os_MessageQueue_nativePollOnce (JNIEnv* env, jobject obj, jlong ptr, jint timeoutMillis) NativeMessageQueue* nativeMessageQueue = reinterpret_cast <NativeMessageQueue*>(ptr); nativeMessageQueue->pollOnce (env, obj, timeoutMillis); } void NativeMessageQueue::pollOnce (JNIEnv* env, jobject pollObj, int timeoutMillis) mPollEnv = env; mPollObj = pollObj; mLooper->pollOnce (timeoutMillis); mPollObj = NULL ; mPollEnv = NULL ; if (mExceptionObj) { env->Throw (mExceptionObj); env->DeleteLocalRef (mExceptionObj); mExceptionObj = NULL ; } }
5.3 Looper.cpp:pollOnce 1 2 3 4 5 6 7 8 9 10 11 12 13 14 15 16 17 18 19 20 21 22 23 24 25 26 27 28 29 30 31 32 33 inline int pollOnce (int timeoutMillis) return pollOnce (timeoutMillis, nullptr , nullptr , nullptr ); } int Looper::pollOnce (int timeoutMillis, int * outFd, int * outEvents, void ** outData) int result = 0 ; for (;;) { while (mResponseIndex < mResponses.size ()) { const Response& response = mResponses.itemAt (mResponseIndex++); int ident = response.request.ident; if (ident >= 0 ) { int fd = response.request.fd; int events = response.events; void * data = response.request.data; if (outFd != nullptr ) *outFd = fd; if (outEvents != nullptr ) *outEvents = events; if (outData != nullptr ) *outData = data; return ident; } } if (result != 0 ) { if (outFd != nullptr ) *outFd = 0 ; if (outEvents != nullptr ) *outEvents = 0 ; if (outData != nullptr ) *outData = nullptr ; return result; } result = pollInner (timeoutMillis); } }
5.4 Looper.cpp:pollInner 1 2 3 4 5 6 7 8 9 10 11 12 13 14 15 16 17 18 19 20 21 22 23 24 25 26 27 28 29 30 31 32 33 34 35 36 37 38 39 40 41 42 int Looper::pollInner (int timeoutMillis) ...... int result = POLL_WAKE; mResponses.clear (); mResponseIndex = 0 ; mPolling = true ; struct epoll_event eventItems[EPOLL_MAX_EVENTS]; int eventCount = epoll_wait (mEpollFd.get (), eventItems, EPOLL_MAX_EVENTS, timeoutMillis); ...... if (eventCount == 0 ) { result = POLL_TIMEOUT; goto Done; } for (int i = 0 ; i < eventCount; i++) { int fd = eventItems[i].data.fd; uint32_t epollEvents = eventItems[i].events; if (fd == mWakeEventFd.get ()) { if (epollEvents & EPOLLIN) { awoken (); } else { ALOGW ("Ignoring unexpected epoll events 0x%x on wake event fd." , epollEvents); } } ...... } Done: ; ...... return result; }
int epoll_wait(int epfd, struct epoll_event * events, int maxevents, int timeout);
等待事件的产生,类似于select()调用。参数events用来从内核得到事件的集合,maxevents告之内核这个events有多大,参数timeout是超时时间(毫秒,0会立即返回,-1将不确定,也有说法说是永久阻塞)。该函数返回需要处理的事件数目,如返回0表示已超时。如果返回–1,则表示出现错误。
epfd是 epoll的描述符。
events则是分配好的 epoll_event结构体数组,epoll将会把发生的事件复制到 events数组中
maxevents表示本次可以返回的最大事件数目,通常 maxevents参数与预分配的events数组的大小是相等的。
timeout表示在没有检测到事件发生时最多等待的时间(单位为毫秒),如果 timeout为0,则表示 epoll_wait在 rdllist链表中为空,立刻返回,不会等待。
5.5 Looper.cpp:awoken 1 2 3 4 void Looper::awoken () uint64_t counter; TEMP_FAILURE_RETRY (read (mWakeEventFd.get (), &counter, sizeof (uint64_t ))); }
读取mWakeEventFd中的值,也就是之前bg线程通过write写入的1. 然后回到Looper.cpp:pollOnce返回1.
这样UI线程就从epoll_wait阻塞状态(或者一直执行Looper.cpp:pollOnce函数的状态)退出,之后回到java层的MessageQueue.next中继续执行。
1 2 3 4 5 6 7 8 9 10 11 12 13 14 15 16 17 18 19 20 21 22 23 24 25 26 27 28 29 30 31 32 33 34 35 36 37 38 39 40 41 42 43 44 45 Message next () { ...... int pendingIdleHandlerCount = -1 ; int nextPollTimeoutMillis = 0 ; for (;;) { ...... nativePollOnce(ptr, nextPollTimeoutMillis); synchronized (this ) { final long now = SystemClock.uptimeMillis(); Message prevMsg = null ; Message msg = mMessages; ...... if (msg != null ) { if (now < msg.when) { nextPollTimeoutMillis = (int ) Math.min(msg.when - now, Integer.MAX_VALUE); } else { mBlocked = false ; if (prevMsg != null ) { prevMsg.next = msg.next; } else { mMessages = msg.next; } msg.next = null ; if (DEBUG) Log.v(TAG, "Returning message: " + msg); msg.markInUse(); return msg; } } else { nextPollTimeoutMillis = -1 ; } ...... } } }
自此,Android的线程切换就结束了。
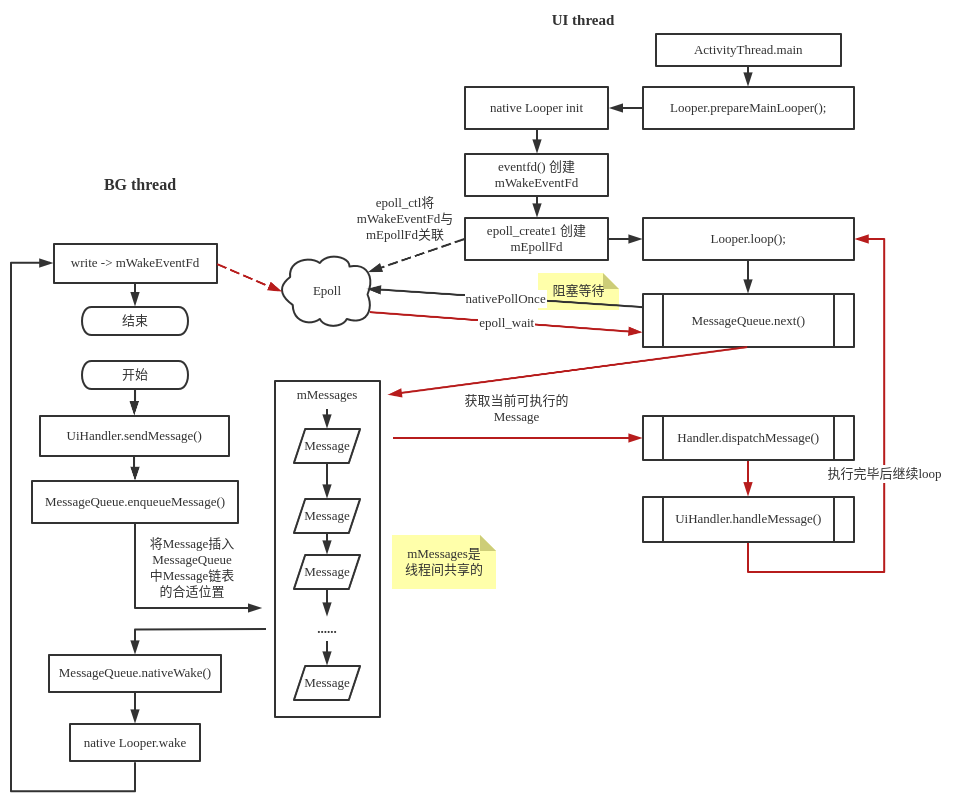
六. 小结 通过上述分析,画一张图来展示一次Message的执行:
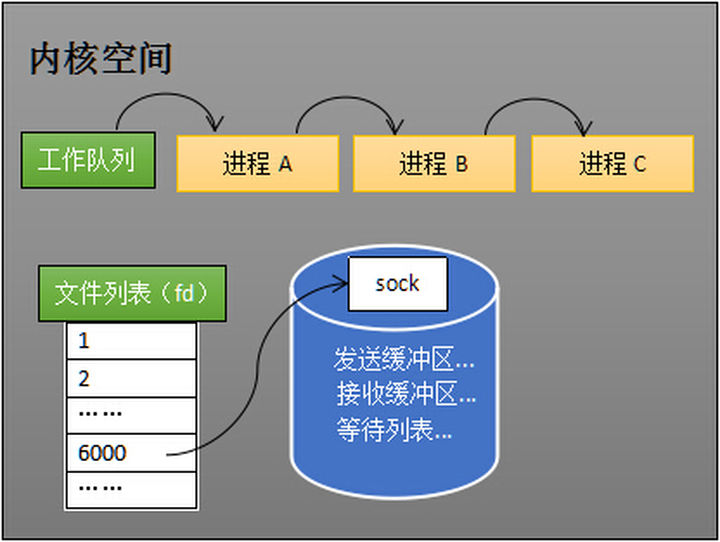
6.1 Epoll机制 关于Eopll推荐大家阅读这篇文: Epoll本质 https://zhuanlan.zhihu.com/p/63179839
cpu running
Ui Thread: epoll_wait
Bg Thread: write fd
Ui Thread: read
